Flutter documentation
New to Flutter?
Once you’ve gone through Get started, including Write your first Flutter app, here are some next steps.
Docs
Coming from another platform? Check out Flutter for: Android, SwiftUI, UIKit, React Native, and Xamarin.Forms developers.
- Building layouts
- Learn how to create layouts in Flutter, where everything is a widget.
- Understanding constraints
- Once you understand that “Constraints flow down. Sizes flow up. Parents set positions”, then you are well on your way to understanding Flutter’s layout model.
- Adding interactivity to your Flutter app
- Learn how to add a stateful widget to your app.
- A tour of the Flutter widget framework
- Learn more about Flutter’s react-style framework.
- FAQ
- Get the answers to frequently asked questions.
- VS Code, latest stable version
- Start VS Code.
- Invoke View > Command Palette….
- Type “install”, and select Extensions: Install Extensions.
- Type “flutter” in the extensions search field, select Flutter in the list, and click Install. This also installs the required Dart plugin.
- Invoke View > Command Palette….
- Type “doctor”, and select the Flutter: Run Flutter Doctor.
- Review the output in the OUTPUT pane for any issues. Make sure to select Flutter from the dropdown in the different Output Options.
- Invoke View > Command Palette.
- Type “flutter”, and select the Flutter: New Project.
- Select Application.
- Create or select the parent directory for the new project folder.
- Enter a project name, such as
my_app, and press Enter. - Wait for project creation to complete and the
main.dartfile to appear. - Locate the VS Code status bar (the blue bar at the bottom of the window):

- Select a device from the Device Selector area. For details, see Quickly switching between Flutter devices.
If no device is available, and you want to use a device simulator, click No Devices and click Start iOS Simulator to launch a simulator.
To setup a real device, follow the device-specific instructions on the Install page for your OS.
- Invoke Run > Start Debugging or press F5.
- Wait for the app to launch—progress is printed in the Debug Console view.
- Open
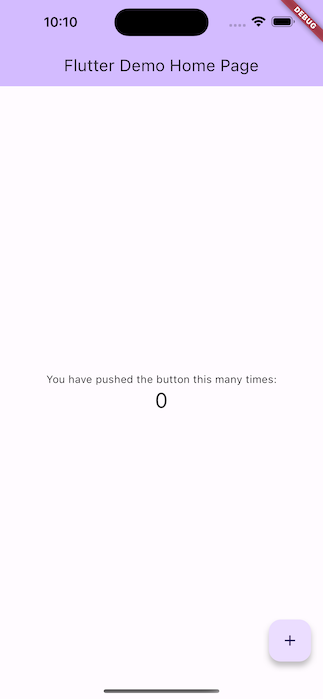
lib/main.dart. Change the string
'You have pushed the button this many times'
to
'You have clicked the button this many times'
- Save your changes: invoke Save All, or click Hot Reload
 .
.
Install
Set up an editor
You can build apps with Flutter using any text editor combined with Flutter’s command-line tools. However, we recommend using one of our editor plugins for an even better experience. These plugins provide you with code completion, syntax highlighting, widget editing assists, run & debug support, and more.
Use the following steps to add an editor plugin for VS Code, Android Studio, IntelliJ, or Emacs. If you want to use a different editor, that’s OK, skip ahead to the next step: Test drive.
nstall VS Code
VS Code is a lightweight editor with complete Flutter app execution and debug support.
Install the Flutter and Dart plugins
Validate your setup with the Flutter Doctor
Test drive
Create the app
The above commands create a Flutter project directory called my_app that contains a simple demo app that uses
The above commands create a Flutter project directory called my_app that contains a simple demo app that uses Material Components.
Run the app
After the app build completes, you’ll see the starter app on your device.
Try hot reload
Flutter offers a fast development cycle with Stateful Hot Reload, the ability to reload the code of a live running app without restarting or losing app state. Make a change to app source, tell your IDE or command-line tool that you want to hot reload, and see the change in your simulator, emulator, or device.
You’ll see the updated string in the running app almost immediately.
Profile or release runs
So far you’ve been running your app in debug mode. Debug mode trades performance for useful developer features such as hot reload and step debugging. It’s not unexpected to see slow performance and janky animations in debug mode. Once you are ready to analyze performance or release your app, you’ll want to use Flutter’s “profile” or “release” build modes. For more details, see Flutter’s build modes.
Write your first Flutter app
You are now ready to start the “First Flutter app” codelab. In about an hour and a half, you will learn the basics of Flutter by creating an app that works on mobile, desktop, and web.
Comments
Post a Comment